At the
time, in 2008, I was building wooden lamps. Lamps were nice, they
have the electricity inside, the cables are integrated in the wood,
the colours, the game of light and shades... But, compared to
sailboats, they are boring. Then I thought.."Hey, I have just
one life, I have to use it to do what I really want to do!. Let's
check if I could build a nice sailboat."
At the
time I was inspired by small, 11-12 ft dinghies. In particular the
racing dinghy International Europa, and the Truc 12, designed by
Marco Croci.


I start
the design process in the traditional manner, with paper and pencil.
After many iterations I had a simple sailboat drawing.

Then,
for tridimensional development I use the software FreeShip. After
many versions, I came with a dinghy that could be built from 3
plywood sheets (2.5 x 1.7 m).

I built
a scaled down cardboard model ...

and
developed a set of drawings:
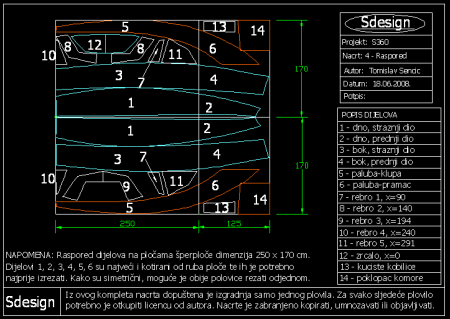

The
first phase of building was the building of the foils for the
daggerboard and for the rudder. I glued up laths of the appropriate
dimensions and used a manual planer to shape them.

Then I
started to build the hull. I used a ruler and a wooden batten to
transfer the drawing lines from the drawing to the plywood sheets.

I cut
the parts. I glued up wooden battens along the borders of the
stations in order to make them stiffer.

The
bottom sides were glued together, and a stations were placed on
positions.

The
internal filets, the stations in place, and the side strips. It looks
like a real small boat.

But there are a lot of small things to do, like protecting internal volumes with some layers of epoxy and with some paint. It is important to do it before closing the volumes. The transom also need to be stiff because it will support the rudder and because it is important for the overall torsional stability. Hence the triangular wooden elements in the corners.


After
finishing the top side, the hull is turned over. The bottom looks
finished, but it needs to be finished with sandpaper and protected.

A layer
of thin glass fiber will be applied and impregnated with epoxy. It
improves the rigidity of the bottom. It makes a composite material.
Or a sandwich of plywood, epoxy resin and glass fibers.


On
the top side, I left some exposed plywood surfaces, without paint. It
is protected by the thin glass fiber fabric, epoxy and some layers of
varnish. On some parts I made some black lines, in order to make it
look like the teak strips. I made
the holes for inspection hatches.

The
mast is also home built. It is an aluminum-wood combination. The sail
groove is a square tube with a cut. The stiffness, or the bending
curve was tested, in order to get a correct sail shape.

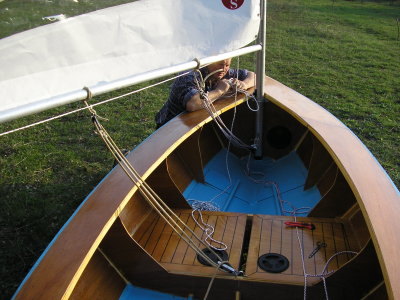
The
boat is finally equipped and almost ready to sail.

I
enjoyed the project and building process a lot. I had to repair some
details at first. And it was far from maintenance-free, but the
process was a joy. Of course, I enjoyed also lot of sailing.
Pros
and cons
+ looks
good
+ light
weight
+ good
light wind performance
+
pleasant to sail
+
simple, fast and cheap building
- there
is no room for a passenger
- can't
be moved by a single person or car topped
-
unpractical to row
-
narrow waterline, instable, not suitable for swimming or fishing
trips
lijepo si to složio,bravo
ReplyDelete"unpractical to row" genialno ;)
ReplyDelete